

Introduction
Varnish is the most popular marine wood finish because it highlights the beauty of the wood grain and produces the highest gloss with the greatest depth and clarity. Varnish also creates a very durable finish to protect wood from damage caused by salt, water, sun, oil, grease, and dirt. Doing the job yourself is not hard, it just takes a few simple tools - and time.
Which varnish should I use?
There are many varnishes available that offer different finishes, such as rubbed effect, high gloss, satin, and matte. Some require a lot more coats, and a lot more sanding between coats than others. We’ve made it easy for anyone to get a high-quality professional finish with our TotalBoat Gleam 2.0, a one-part marine spar varnish that’s easy to apply by brushing, rolling, or spraying. Its unique formula can be overcoated much sooner than traditional varnishes, so you finish varnishing faster and get a beautiful, long-lasting finish with maximum UV protection and water resistance.
What are the best conditions for varnishing?
If varnishing outdoors, pick a bright, clear day. The best time to start is mid to late morning (if possible), when the dew is gone, and there’s less breeze . Try to stay out of the wind and direct sunlight, which can cause uneven drying and wrinkling. Better yet, apply varnish indoors where you have proper ventilation. Also, pay special attention to the varnish manufacturer’s recommendations for temperature and humidity.
Tools
- Nitrile Gloves
- Protective Eyewear
- 3M Half Mask Respirator for Paint
- Tyvek Sleeves
- Tyvek Apron
- 3M ScotchBlue Pre-Taped Painter's Plastic
- 3M 2090 Blue Masking Tape
- 3M 233+ Masking Tape
- 3M Masking Film
- Badger Hair Brush
- Premium Foam Brushes
- TotalBoat Plastic Paint Pots
- Wooden Stir Sticks
- Paint Strainers
- Tack Cloth
- Mineral Spirits
- 3M Stikit Sanding Hand Block
- 3M Stikit 216U Gold Sanding Rolls
- Xylene (Xylol)
Video Overview
-
-
Remove old varnish in bad condition: Use a chemical paint stripper, such as TotalBoat TotalStrip (See Stripping Project Guide) or a heat gun and a scraper to remove any varnish that's peeling or cracked.
-
Clean dirty teak: Clean and brighten gray, dirty, dull teak with TotalBoat Teak Cleaner, as directed.
-
Use a bristle brush and scrub across the grain. Scrubbing with the grain can push dirt deeper into the grain and remove the soft grain, leaving an uneven surface.
-
Rinse thoroughly and allow the wood to dry completely before sanding.
-
Optional - Mask to protect adjacent surfaces while sanding. Use a quick-release masking tape, such as 3M 2090 Blue Painter's Tape. You will remove this masking tape after sanding.
-
-
-
Sanding levels the surface and removes any residual old varnish. After sanding, remove any masking tape applied previously and reapply masking tape before solvent wiping and varnishing.
-
Sanding Tip: Before you start sanding, make sure the surface is clean and dry. The most important thing to remember is to sand in the direction of the grain using the appropriate grit sandpaper for the task. This will prevent scratches, which can be visible even through several coats of varnish.
-
New Wood: Use 220-grit sandpaper and sand smooth in the direction of the grain. Remove sanding dust and wipe away residue with a tack cloth. Follow by wiping with a lint-free cotton rag wetted with TotalBoat Special Brushing Thinner 100. Let the solvent dry completely before masking or application.
-
Teak Wood: If teak was cleaned with a teak cleaner, such as TotalBoat Teak Cleaner, sand smooth, in the direction of the grain, with 220-grit sandpaper, then follow with 320-grit sandpaper. Wipe with a tack cloth and follow with a clean, lint-free cotton rag wetted with TotalBoat Special Brushing Thinner 100. Allow to evaporate completely before applying varnish.
-
If teak was already clean and smooth: Use 320-grit sandpaper to sand in the direction of the grain. Remove sanding dust and wipe away residue with a tack cloth. Follow by wiping with a clean, lint-free cotton rag wetted with TotalBoat Special Brushing Thinner 100.
-
Previously Varnished Wood: If the previous coating was in bad condition & removed with a chemical stripper: Sand clean, dry surface smooth with 320-grit sandpaper. Wipe away residue with a tack cloth, and follow with a clean, lint-free cotton rag wetted with TotalBoat Special Brushing Thinner 100. Let it dry before application or masking.
-
If the previous finish is in good condition: Sand with 320-grit sandpaper, remove sanding dust, wipe clean with a tack cloth, and follow with a clean, lint-free cotton rag wetted with TotalBoat Special Brushing Thinner 100.
-
-
-
To protect adjacent surfaces from varnish, mask with a safe-release masking tape such as 3M 2090 Blue Painter's Tape and 3M advanced masking film. You can also use a pretaped film such as 3M ScotchBlue Pre-Taped Painter's Plastic.
-
Masking Tip: Professional varnish applicators use two rows of quick-release masking tape, as shown here. The blue tape layer (3M 2090) is laid down first, and the green tape layer (3M 233+) is laid down against the edge of the application surface because 233+ is better at conforming to contours and complex shapes.
-
-
-
Before applying varnish, do one last solvent wipe to remove contaminants, and allow the surface to dry completely. Wipe the surface with a clean, lint-free rag dampened with TotalBoat Special Brushing Thinner 100.
-
-
-
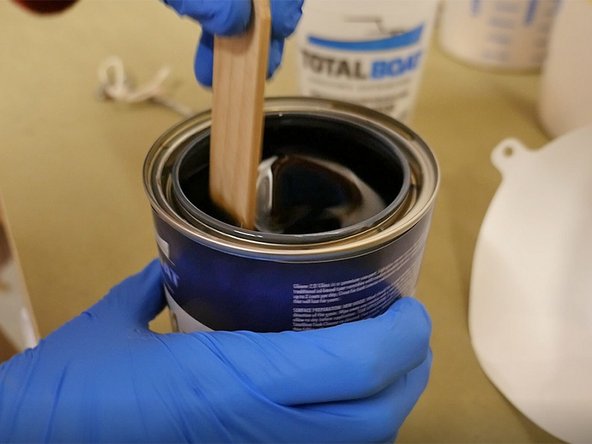
Stir the varnish gently from the bottom to the top — do not shake the can of varnish. Aggressive stirring or shaking will introduce bubbles in the varnish, which you definitely don't want.
-
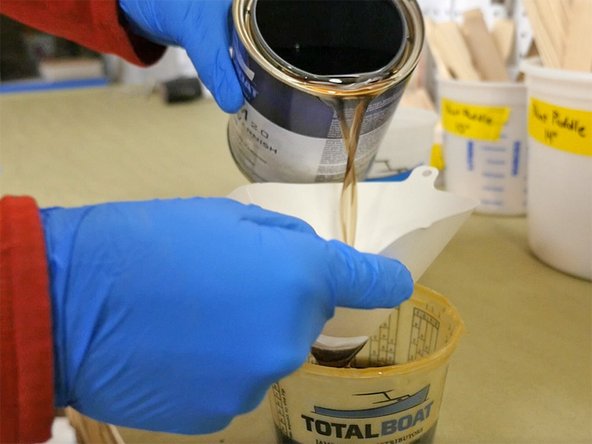
Filter the varnish by pouring it through a varnish strainer and into a separate, clean container. This will also prevent contamination of the varnish remaining in the can. Pour only the amount you'll use in any one application.
-
-
-
Gleam 2.0 Gloss vs. Satin Finish: Gloss varnish can be built up to a desired finish and depth. For a Satin finish, always use Gloss for build coats. Use Satin only for the final coat. Just before applying the final coat, sand lightly with 320-grit sandpaper and remove residue. The same goes for matte or rubbed effect finishes.
-
Thinning: Brushing - Typically, you don't need to thin varnish after the first coat, but for desired flow, you may need to thin 5-10% with TotalBoat Special Brushing Thinner 100 in warmer conditions over 75°F. Spraying - Reduce 10-25% with xylene, and follow overcoat procedures below. IMPORTANT: Only thin if needed to improve flow.
-
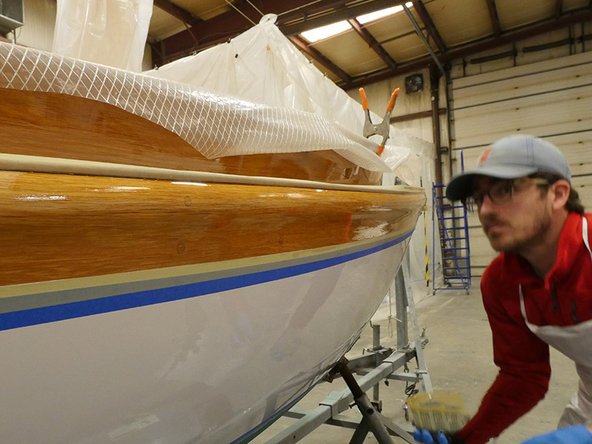
Application Tips: (1) Avoid brush marks— maintain a wet edge by brushing the newly applied varnish back into the area just applied, using light pressure and a feathering motion. (2) Apply varnish in adequate light to see skips or holidays. (3) Leave trapped dust specs or bugs alone until varnish tacks over—you can sand them out between coats.
-
Overcoat Times: Gleam 2.0 is unique & can be overcoated sooner than traditional varnishes. Minimum overcoat times are: 1 hr. @ 80°F, 3 hrs. @ 65°F, or 8 hrs. @ 50°F (at 3 mils wet film thickness), with a maximum of 3 coats per day. A total of at least 4-6 coats will give the best finish & depth. The more coats, the better the finish.
-
TotalBoat Gleam 2.0 can cure in temperatures as low as 45°F, but the ideal temperature range for application is between 60-85°F max. 105°F), with a relative humidity (RH) of 0-85%. Previously Sealed or Coated Wood: Apply Gleam 2.0 to properly prepared surface.
-
New Wood: Sealer Coat - For the first coat only, reduce Gleam 2.0 25% with TotalBoat Special Brushing Thinner 100 so the varnish can penetrate and seal the wood grain. NOTE: Instead of thinning the first coat, you can apply TotalBoat Wood Sealer (2-3 coats) to properly prepared wood, and let dry 24 hours before applying Gleam 2.0.
-
Sanding Tips: No sanding is needed if you overcoat within 48 hours. Don't sand unless the most recent coat has dried for 24 hours. Use 320 grit to prevent scratches; sandpaper finer than 320 grit will not allow proper adhesion. Remove residue before reapplying. Do not use any solvents to wipe down the surface within 48 hours of applying.
-
Sanding Tips (cont'd.): If you've applied 2-3 coats in one day, allow 48 hours drying time, then sand lightly, with the grain, using 320-grit sandpaper, before overcoating or applying the final coat. If 1 coat has been applied, the surface can be sanded within 24 hours.
-
-
-
When working with varnish, thinners, and solvents, it's important to wear proper personal protective equipment (PPE).
-
Before you begin, we recommend the following:
-
Review the information in the SDS (safety data sheets) for each product, including Section 8: Exposure Controls/Personal Protection.
-
Gather the proper PPE, as listed by the product manufacturers, for example, suitable gloves and proper protection for skin, lungs, eyes, and clothing.
-
-
-
Gleam 2.0 does not dry fast enough, or dries on the surface only:
-
Improper temperature & humidity: Only apply Gleam 2.0 in the recommended temperature / humidity ranges.
-
Thinned with improper solvents: Only use the solvents / percentages advised for Gleam 2.0.
-
Thinned too little or too much: When temperature / humidity conditions are at the end of the usable spectrum, thinning may be necessary. You may also want to thin to achieve desired flow. Over-thinning can cause drips, sags, and improper coating thickness.
-
Gleam 2.0 did not stick to the surface:
-
Improper surface preparation: For best results and adhesion, wood must be prepped properly. The surface must be cleaned, sanded, and free of dust, dirt, grease, or oil before applying Gleam 2.0.
-
There's a 'fish eye' effect in the finish:
-
Improper thinning and/or surface contamination: Sand down the finish and reapply Gleam 2.0, as directed. Only use the recommended solvents and application methods. Also, make sure any mixing pots, stir sticks, brushes, and spray guns are clean, dust-free, free of grease/oil, and free of any other contaminants before applying.
-


Now that you’ve finished varnishing, you’ll want to maintain that beautiful finish by doing yearly maintenance coats on exterior surfaces to enhance the beauty and UV protection. Every year, start by cleaning the Gleam 2.0 varnished surface with an all-purpose boat soap, such as TotalBoat Boat Soap, and dry the surface completely. Apply 1-2 coats of Gleam 2.0, according to label directions.
Now that you’ve finished varnishing, you’ll want to maintain that beautiful finish by doing yearly maintenance coats on exterior surfaces to enhance the beauty and UV protection. Every year, start by cleaning the Gleam 2.0 varnished surface with an all-purpose boat soap, such as TotalBoat Boat Soap, and dry the surface completely. Apply 1-2 coats of Gleam 2.0, according to label directions.