Introduction
Want to put a beautiful, super glossy shine on your bar, counter, or table top, but not sure how to do it? The TotalBoat Clear Epoxy Bar & Table Top Kit helps you put a restaurant-quality, high-gloss shine on bars, tables, and countertops, with a BPA-free cured finish safer for potential food contact. Convenient kits contain our crystal-clear, self-leveling TotalBoat TableTop Epoxy, mixing tools, heat gun, and simple instructions for professional results, even if it's your first time using epoxy. Choose these kits to save time and money on your next project.
Tools
-
-
To figure out how much epoxy you need, you can use our epoxy calculator, or do the math yourself, using the formula below.
-
Measure the area to be covered with epoxy to determine how much you’ll need. To calculate the area, multiply the Length x Width X Depth (of epoxy pour) to determine the volume needed in cubic inches.
-
The maximum pour depth for TotalBoat TableTop Epoxy (resin & hardener combined) is 1/8" - 1/4".
-
For example, if your table is 2 feet wide by 4 feet long, and you want the depth to be 1/4", multiply 24" x 48" x 1/4". The answer is 288 cubic inches.
-
Once you know the volume in cubic inches, you can use the information below to determine how much mixed TotalBoat TableTop Epoxy you'll need. If you're doing more than one pour, you'll need to estimate the additional amount.
-
► 1 quart of mixed epoxy = 57.75 cubic inches ► 2 quarts of mixed epoxy = 115.5 cubic inches ► 3 quarts of mixed epoxy = 173.25 cubic inches ► 1 gallon of mixed epoxy = 231 cubic inches
-
-
-
Position your table top so it’s at a comfortable height. Depending on the height of your work area, you may need to remove the legs from your table or it'll be hard to work on the table top.
-
Be sure your table top is level.
-
-
-
Clean the table top by wiping with a clean rag wetted with acetone or denatured alcohol. NOTE: Use acetone for white oak or oily hardwoods because it helps remove surface oil and improves adhesion. For most other wood species, you can use denatured alcohol instead of acetone.
-
Sand the wood with 120-grit sandpaper so the epoxy (or embedded object) bonds properly. Vacuum to remove sanding dust, and wipe again with a clean rag dampened with acetone or denatured alcohol.
-
-
-
In this example, we’re applying an adhesive-backed, plastic-coated nautical chart to the table top.
-
If you're using photographs or other paper items, laminate them first, or use an alternative sealant to prevent damage.
-
It’s important to adhere the item securely to the table top before you flood the surface with mixed epoxy.
-
-
-
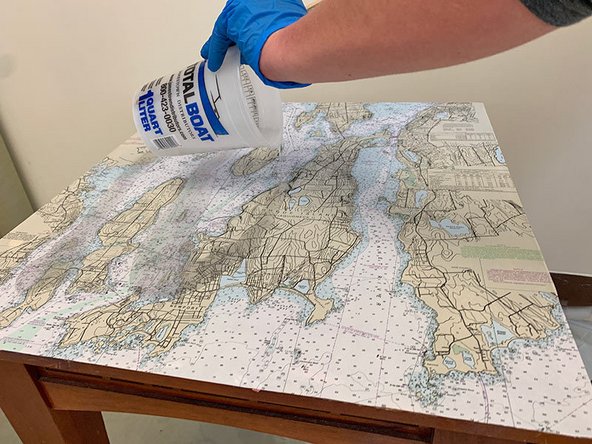
Mix a small batch of TotalBoat TableTop Epoxy for a thin seal coat (approximately 1/8" depth). Combine 1 part resin and 1 part hardener, by volume. If measuring by weight, combine 100 parts resin (part A) to 83 parts hardener (Part B).
-
How to measure epoxy resin and hardener components by weight:
-
Select grams on your scale.
-
Place your mixing cup on the scale and zero out the weight.
-
Add the desired amount of resin (Part A) to the cup.
-
Determine the amount of TotalBoat TableTop hardener (Part B) by multiplying the gram weight of the resin x .83. For example, if you pour 45g of resin, you would multiply 45g x .83 to get the amount of hardener to add, which is 37g.
-
Mix thoroughly using the 2-cup mixing method: Stir slowly for about 2-3 minutes, scraping the sides and bottom of the cup to mix both components thoroughly. Next, pour the mixture into a clean mixing cup and stir again for 2-3 minutes. Mixed epoxy should be clear, not cloudy.
-
-
-
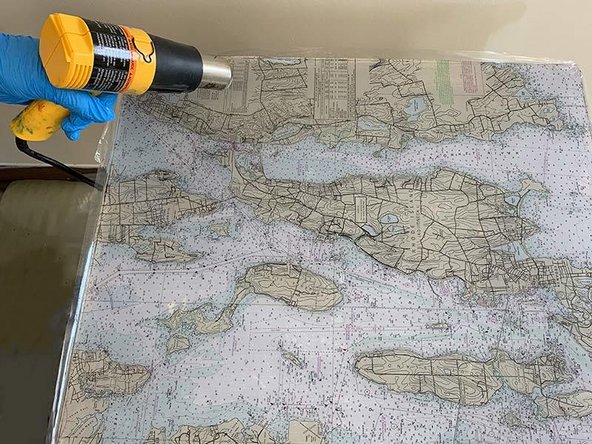
Apply a thin coat of mixed epoxy to seal the surface.
-
After pouring the epoxy, spread it with an epoxy spreader or use the heat gun (keep the heat 6” off the surface, and keep it moving).
-
The seal coat creates an ideal surface for the flood coat to bond to. If you're applying the seal coat to bare wood (instead of a nautical chart, as shown here), the seal coat prevents air in the wood from off-gassing & creating bubbles in the flood coat.
-
-
-
Allow the seal coat to cure for 24 hours.
-
Sand the surface lightly with 120-grit sandpaper. Be sure not to sand through the seal coat.
-
Solvent-wipe the surface with acetone to remove sanding residue. Let the surface dry completely before taping the edges to form a dam for flood coats.
-
-
-
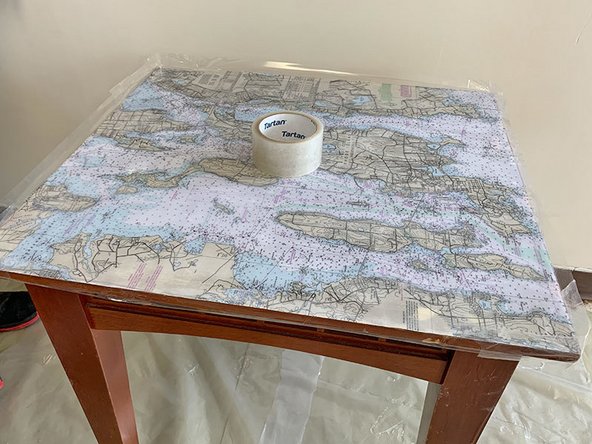
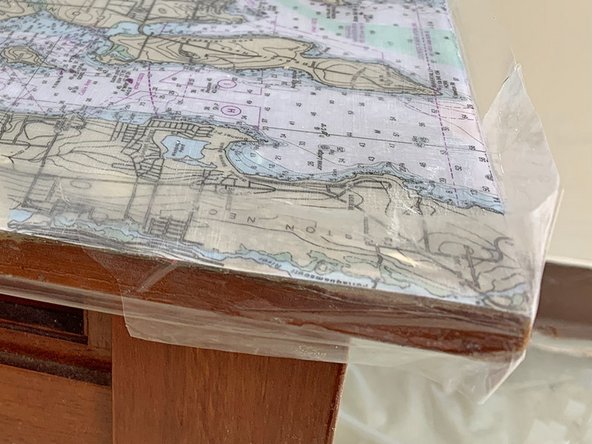
Form a dam by applying clear packing tape around the edges of the table. Make sure you have at least 1” of tape sticking up beyond the top edge of the table to contain the flood coat(s) of epoxy.
-
Taping Tip: Add more tape at the corners to provide added support to the tape barrier.
-
-
-
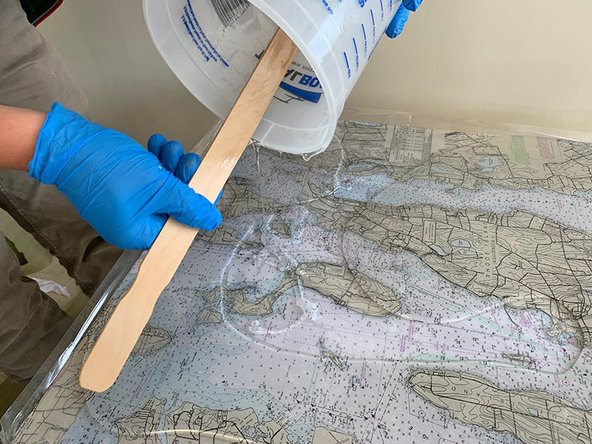
Mix enough epoxy to pour only one layer at a time, at a maximum recommended depth of ¼ inch.
-
Dispense 1 part resin to 1 part hardener (by volume) into a clean mixing cup. Mix com- ponents thoroughly, using the 2-cup mixing method mentioned in Step 6.
-
POUR: IMPORTANT! Pour the epoxy no more than ¼ inch at a time (per layer).
-
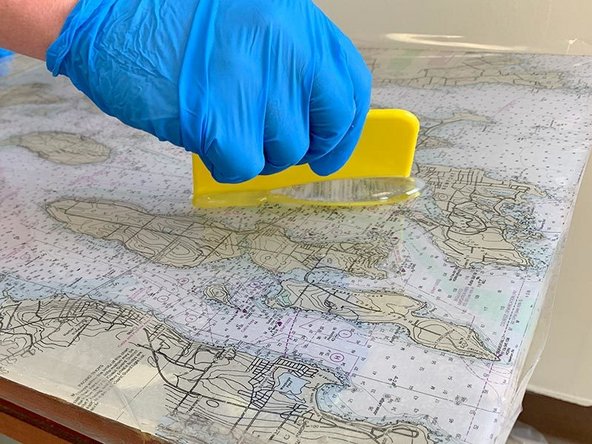
Pour mixed epoxy slowly onto the table top, distributing it across the top while pouring. Use the yellow scraper and the heat gun to move the epoxy around and help spread it evenly.
-
Wave the heat gun quickly back and forth above the surface to pop any air bubbles. Keep the heat gun moving so you don't scorch the surface.
-
-
-
If you plan to do multiple flood coats to build depth, wait 4-8 hours before doing another pour. You'll want to pour the next layer when the epoxy is still in the gel state and the heat caused by the reaction has dissipated.
-
If you wait for the surface to harden completely, you’ll need to sand in between pours (using 120 grit, vacuum & solvent wipe clean). Sanding between coats will not adversely affect the cosmetics of the final product—the hazy surface will become clear again when you pour the next flood coat.
-
Continue to pour in shallow ⅛-¼ inch layers, waiting 4-8 hours in between layers, until you reach the desired thickness.
-
Tip: For best results on the finished edge, it’s important to maintain the edge between pours. Depending on the condition of the tape, you may need to change the tape between pours, once the epoxy has set up.
-
-
-
Remove the tape. Sand any rough edges with 120 grit, and wipe with acetone.
-
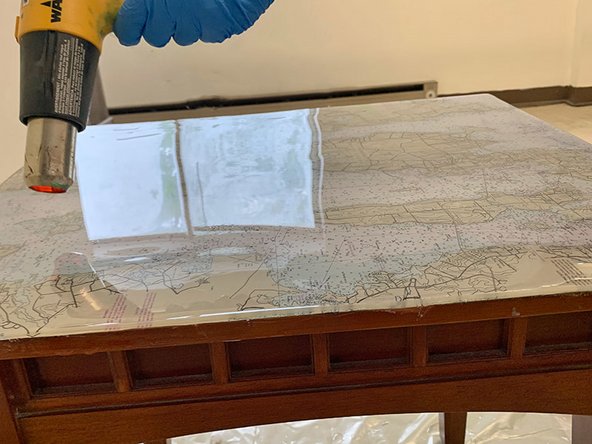
Pour mixed epoxy slowly onto the table top, distributing it across the top as you pour. Use the yellow scraper and the heat gun to move the epoxy around, help spread it evenly, and pop any air bubbles.
-
Allow the mixed epoxy to flow over the sides. Use a plastic spreader to help smooth the vertical edges.
-
Use the heat gun on its lowest setting to remove air bubbles. Wave it back and forth quickly above the surface, and keep it moving so you don't scorch the surface.
-
-
-
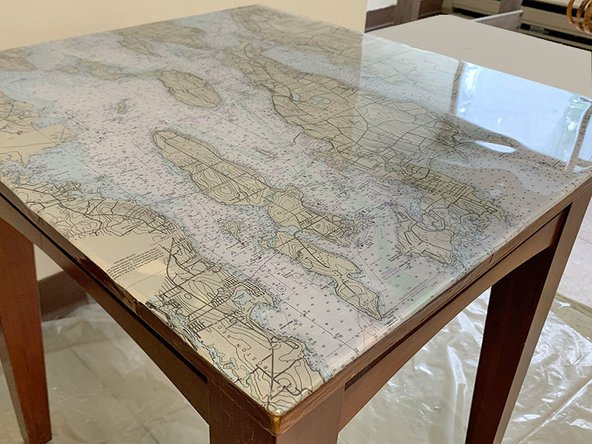
Before sanding, wait about two days for the epoxy to cure completely.
-
When the epoxy ran over the sides in the previous step, it created drips on the bottom, which you’ll want to remove by sanding with 120 grit, or chiseling.
-
After sanding, solvent-wipe with acetone to remove residue.
-
If you removed the table legs in Step 2, you may reattach them now.
-
-
-
IMPORTANT:
-
Do not place items hotter than 125°F on the cured surface, or it will become discolored and distorted.
-
TotalBoat TableTop Epoxy is not intended for outdoor applications that will have prolonged exposure to sunlight. If the cured epoxy table top is to be used outdoors, coat with a UV-stable varnish such as TotalBoat Halcyon Clear rugged gloss or satin varnish.
-
-
-
What is epoxy sensitization? Ever hear of someone getting a skin rash after using epoxy? A rash is one form of sensitization — it's the process where your body gets more and more sensitive to epoxy products. Rashes are a common sign, but eyes, nose, throat, & lungs can also be affected. Everyone reacts differently, so proper PPE is critical.
-
Before you start this project, we recommend the following:
-
Take a look at the SDS (safety data sheets) for each product, paying special attention to the safety information in Section 8: Exposure Controls/Personal Protection.
-
Gather the proper PPE (personal protective equipment) recommended by the manufacturers, such as suitable gloves, and proper protection for skin, lungs, eyes, and clothing.
-
Be sure your work area is well ventilated.
-