Introduction
This simple technique creates the illusion of white Italian marble that’s so real no one will know the difference! All it takes is a few simple ingredients and a little attention to timing.
Creating a white epoxy faux marble countertop is fun and easy with our TotalBoat Epoxy Marble Effect Countertop Kit, which contains almost everything you need, including our TotalBoat TableTop Epoxy and Hardener, preferred for its clarity, simple 1 to 1 mix ratio , and self-leveling properties that give you great results - even if you’ve never used epoxy before. The kit also has liquid pigment for the white top, mica powder marble effect pigments, mixing cups, stir sticks, a heat gun for creating the marbling effect & popping small air bubbles, and more. All you do is provide the countertop. It can be a top you’ve fabricated from wood, or a tired old countertop that needs a new look. You’ll be please and amazed at the beautiful results! Once you learn this simple technique you can apply it on serving trays, kitchen islands, and more.
How much TotalBoat TableTop Epoxy do I need?
An easy way to estimate the amount of epoxy for your project is to use our epoxy calculator – or you can do the math yourself by measuring the area to be filled with mixed epoxy. Mixed epoxy refers to the total amount of resin and hardener combined.
Note: The maximum depth per layer of TotalBoat TableTop Epoxy is 1/8”-1/4”.
To calculate the area, multiply Length x Width x Depth to determine the volume needed in cubic inches.
1 quart of mixed epoxy = 57.75 cubic inches
2 quarts of mixed epoxy = 115.5 cubic inches
3 quarts of mixed epoxy = 173.25 cubic inches
1 gallon of mixed epoxy = 231 cubic inches
TotalBoat Epoxy Marble Effect Countertop Kits are available in a 2-Quart Kit (1 Quart TotalBoat TableTop Epoxy Resin Part A, and 1 Quart TableTop Hardener Part B), and a Gallon Kit (1/2 Gallon TableTop Epoxy Resin Part A, and 1/2 Gallon TableTop Hardener Part B).
IMPORTANT: The timing and accuracy of each step are critical to achieving successful results. Please read all instructions carefully before you begin.
-
-
Epoxy makes a mess, so cover your work surface with plastic sheeting to protect it.
-
Put the gloves on and lay out your materials so they're within reach and you don't have to waste time searching for them after you've mixed the epoxy.
-
-
-
Level your countertop surface.
-
Sand the wooden top lightly with 80-220 grit sandpaper so the epoxy will adhere properly (depending on the type of surface you have).
-
Remove sanding residue by wiping the surface with a clean rag dampened with acetone or isopropyl alcohol.
-
-
-
Before you take the lids off the resin and hardener bottles, figure out how much you'll need for each layer. Use our handy epoxy calculator, or do it yourself. Just remember, that TotalBoat TableTop Epoxy is a clear coating epoxy, not a deep casting epoxy, and has a maximum depth per layer of 1/8"-1/4".
-
To calculate the volume of mixed epoxy you'll need for each layer, multiply the length (of the countertop) x width (of the countertop) x depth (of the epoxy coating) to get the amount of mixed epoxy needed in cubic inches. Then look at the conversions in the following list to determine how much mixed TotalBoat TableTop Epoxy you'll need.
-
1 Quart of mixed epoxy = 57.75 cubic inches
-
2 Quarts of mixed epoxy = 115.5 cubic inches
-
3 Quarts of mixed epoxy = 173.25 cubic inches
-
1 Gallon of mixed epoxy = 231 cubic inches
-
For example, in this project, you'll be applying a thin 1/16" seal coat of mixed epoxy to seal porous surfaces (more on this in the next step) followed by a slightly thicker 1/8" 'flood' coat. Let's say your countertop is 24" wide and 48" long.
-
The calculation for the seal coat is: 24" x 48" x 1/16" = 72 cubic inches. If 1 quart of mixed epoxy is 57.75 cubic inches, you'd need a little less than 1.5 qts. of mixed epoxy to cover you table with a 1/16" seal coat. The calculation for the flood coat is: 24" x 48" x 1/8" = 144 cubic inches. That's about 2.25 qts. of mixed epoxy.
-
-
-
What is a seal coat and why is it important? A seal coat is a thin layer of mixed epoxy used to seal porous surfaces. This important step prevents air in the wood from off-gassing and creating air bubbles after you've poured a flood coat of epoxy over it.
-
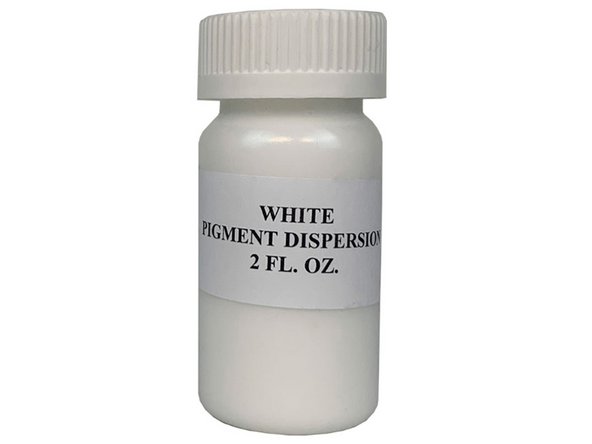
Which white pigment do I use for the seal coat? Good question! The TotalBoat Marble Effect Kit contains a white liquid opaque pigment, which is used for the seal coat and flood coat of mixed epoxy resin, before marbling pigments are added. The white mica powder pigment can be used to add a little extra sparkle to the flood coat, if desired.
-
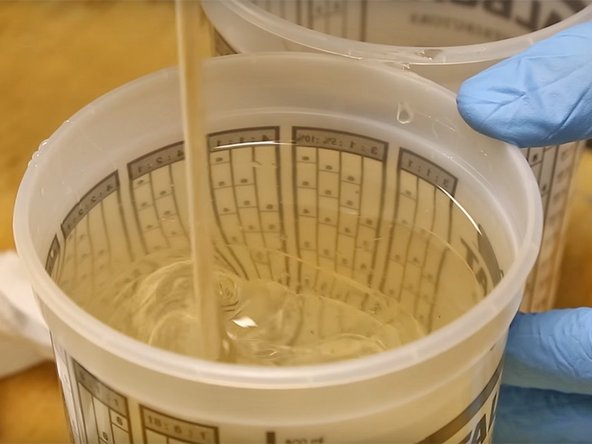
Dispense the resin and hardener components: Combine TotalBoat TableTop Epoxy at a 1:1 ratio of 1 part resin (Part A) to 1 part hardener (Part B), by volume, in a clean plastic mixing cup (included in the kit).
-
Use the 2-cup mixing method to combine thoroughly: The secret to getting great results is to make sure both components are completely mixed before adding any pigment. Use a wooden mixing stick to stir gently for 2-3 minutes, scraping the sides and bottom of the cup. Transfer to a second mixing cup and stir again for another 2-3 minutes.
-
Add liquid white opaque pigment (see third image) to the mixed epoxy, stirring in a few drops at a time, until the mixed epoxy becomes a solid white color.
-
Tinting Note: The amount of liquid white opaque pigment to add is not exact — it will depend on the volume of mixed epoxy and your preference for how 'solid', or opaque (not see-through), the solid white color should be. Start with a small amount of pigment, and increase drop by drop until you reach the desired opacity.
-
-
-
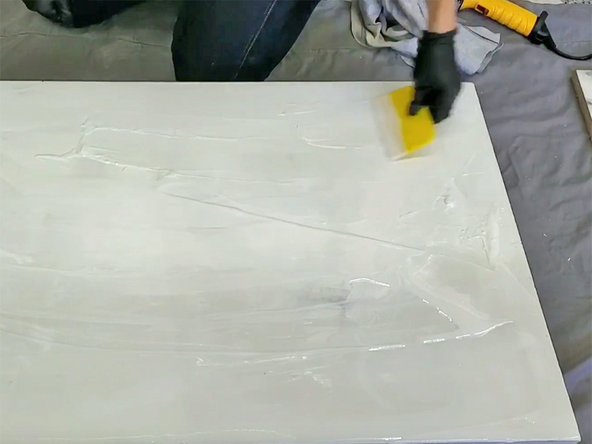
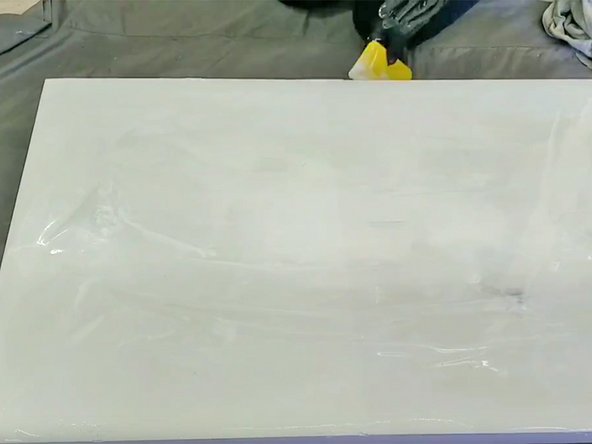
Pour a thin seal coat of white mixed epoxy onto the surface at a depth of 1/16". Use a plastic epoxy spreader to distribute the epoxy until the entire surface is a uniform thickness.
-
Don't worry about making the entire surface solid white; if any dark white or gray spots bleed through, these will improve the marbling effect.
-
Wait for the epoxy seal coat to set up and be tack-free before applying your flood coat. During this time, the epoxy will begin to set up, and the surface will be somewhat hard, but tacky (sticky).
-
If you wait for the surface to harden completely, don't worry. Before continuing, you will need to sand the surface lightly with 220-grit sandpaper and remove sanding residue by wiping with a clean, lint-free rag dampened with acetone or isopropyl alcohol. Sanding the cured surface in this manner enables the next coat of epoxy to adhere properly.
-
-
-
Mix more TotalBoat TableTop Epoxy (1 part resin to 1 part hardener) in a large container, until combined thoroughly. You will need to mix enough epoxy for a 1/8" deep white flood coat, light gray epoxy 'marbling', dark gray epoxy 'veins', and a small amount of clear mixed epoxy that you'll use to keep the gray and black from mixing together on the surface.
-
You'll need most of the mixed epoxy for the flood coat, and you'll need small, equal amounts of light gray, dark gray, and clear for the marbling effect. After mixing the epoxy thoroughly, do the following:
-
For the light gray marbling: Pour a small amount of clear mixed epoxy into a clean 8 oz. plastic mixing cup. Use a small, clean wooden stir stick to add a little light gray mica powder to the epoxy, and stir thoroughly. If necessary, continue adding small amounts of light gray pigment, as desired, and stir thoroughly.
-
For the dark gray veins: Pour a small amount of clear mixed epoxy into a clean 8 oz. plastic mixing cup. Use a small, clean wooden stir stick to add a little dark gray mica powder to the epoxy, and stir thoroughly. If necessary, continue adding small amounts of dark gray pigment, as desired, and stir thoroughly.
-
For the clear buffer: Pour a small amount of clear mixed epoxy into a clean 8 oz. mixing cup.
-
For the white flood coat: Add the liquid white opaque pigment to the mixed epoxy, stirring in a few drops at a time, until the mixed epoxy becomes a solid white color, and reaches the desired opacity.
-
Optional: When tinting the white flood coat, if you want to add a little sparkle to the white surface, after you've mixed in the liquid white opaque pigment to your liking, add in a tiny amount of the silver pearl mica powder, and stir thoroughly.
-
-
-
Pour the white mixed epoxy across the surface in an 'S' shape.
-
Use a clean plastic spreader to distribute the epoxy until it covers the top and surfaces at a uniform depth of about 1/8".
-
-
-
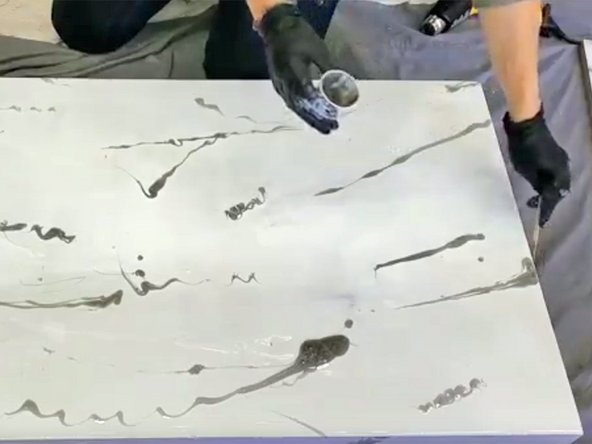
After spreading and leveling the white epoxy flood coat, use your small cup of light gray resin to start the marbling effect.
-
Drizzle lines of the light gray epoxy in random locations on the top and down the sides of the white epoxy surface. It's best to keep the lines going in a similar direction to mimic marble's natural lines.
-
Use a small, clean wooden stir stick to help you control the light gray line of epoxy as you apply it.
-
-
-
Using your gloved fingertips or a dry chip brush, tap gently on the light gray resin streaks to create a feathering effect, as shown here.
-
With the heat gun on its lowest setting, hold it about 2-3 inches from the surface, and gently wave it back and forth quickly, aiming the stream of hot air at the light gray feathered areas to loosen up the lines a little bit and pop any small air bubbles on the surface.
-
Do not hold the heat gun in one spot for very long or you'll scorch and discolor the surface, spoiling the marbling effect. Instead, be sure to keep it moving, and stay 2-3 inches above the surface.
-
-
-
Continue creating the marbling effect by adding dark gray 'veins'. Use a clean wooden stir stick to apply thin lines of the dark gray mixed epoxy on the surface, similar to the way you applied gray epoxy in the previous step.
-
The best place to add the dark gray veins is on top of, or close to, the light gray feathered areas.
-
To prevent the light gray and dark gray epoxy from running together, pour a small amount of the clear, mixed epoxy where you intend to make the dark gray vein, then apply the dark gray vein on top of the clear epoxy. If you want the dark gray and light gray to blend, do not add clear mixed epoxy before adding the dark gray vein.
-
-
-
You may wish to add more white over dark areas, or add more light gray feathering and dark gray veins.
-
Use the heat gun to blend in any epoxy you add.
-
Continue until you're satisfied with the marbling effect.
-
At this point, you can either allow the epoxy to cure completely, then go to Step 13, where you'll remove any epoxy bumps that formed underneath the bottom edge. Or, you can allow the epoxy to cure until it's tack-free then go to Step 12 and apply an optional clear coat for added shine, durability, and depth.
-
-
-
After the marbled epoxy has partially cured, you can add even more shine and durability to your surface by adding a clear layer of mixed epoxy on top. Begin by raising your surface off of the table or work area by placing it on cups.
-
Mix enough resin and hardener to cover the top and sides in a 1/8" thick layer — do not add white pigment.
-
Pour the epoxy, and use a plastic spreader to level it out. You can let the clear epoxy pour over the sides on this step, brushing or spreading it with your fingers along the sides to help make sure you have an even edge.
-
Use a heat gun to remove bubbles and to move the veins of color around to enhance the marble effect. Wave the heat gun about 4-6 inches from the surface and keep moving to avoid burning the epoxy.
-
-
-
Allow 5-7 days for the surface to harden completely.
-
Once it's cured, you can flip your project over and use a sander to remove any unwanted droplets on the bottom edge.
-
Be sure to wear gloves and a proper respirator when sanding cured epoxy.
-
-
-
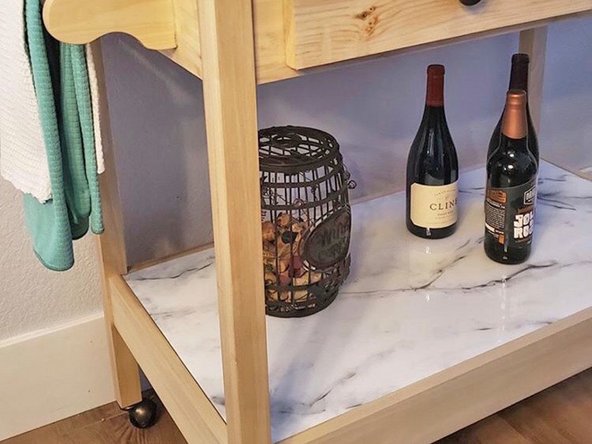
Place your items on the beautiful new top, then show it off!
-
Do not place items hotter than 125°F on the cured surface, or it will discolor and become distorted.
-
-
-
What is epoxy sensitization? Ever hear of someone getting a skin rash after using epoxy? A rash is one form of sensitization — it's the process where your body gets more and more sensitive to epoxy products. Rashes are a common sign, but eyes, nose, throat, & lungs can also be affected. Everyone reacts differently, so proper PPE is critical.
-
Before you start creating your epoxy marble effect countertop, we recommend the following:
-
Take a look at the SDS (safety data sheets) for each product, paying special attention to the safety information in Section 8: Exposure Controls/Personal Protection.
-
Gather the proper PPE (personal protective equipment) recommended by the manufacturers, such as suitable gloves, and proper protection for skin, lungs, eyes, and clothing.
-
Make sure your work area is well ventilated.
-