

Introduction
What is an epoxy river table?
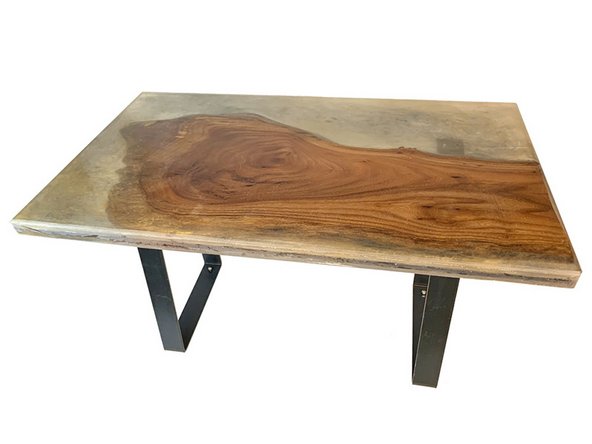
An epoxy river table is created by pouring a ‘river’ of epoxy into a prepared wooden frame so the epoxy runs between two pieces of wood or around a single piece of wood (as created in this guide).
Your epoxy river table can be clear or tinted, and you can cast small objects in place in the epoxy, such as rocks and shells, to add interest.
Creating a river table is easy and fun with our TotalBoat Epoxy River Table Project Kit, which contains almost everything you need, including TotalBoat High Performance Epoxy and Hardener, mica powder pigments, mixing cups, stir sticks, a heat gun for popping small air bubbles, and more. All you do is provide the wood for the table top and the frame. You’ll be please and amazed at the beautiful results! Once you learn this simple technique you can apply it to other projects such as epoxy river shelves and epoxy river kitchen islands.
How much epoxy do I need?
To make it easy, try our simple epoxy calculator to determine how much resin your project will require, or calculate the amount yourself.
Measure the area to be filled with epoxy to determine how much mixed epoxy you’ll need. Mixed epoxy refers to the total amount of resin and hardener combined.
To calculate the area, multiply Length x Width x Depth to determine the volume needed in cubic inches.
1 quart of mixed epoxy = 57.75 cubic inches
2 quarts of mixed epoxy = 115.5 cubic inches
3 quarts of mixed epoxy = 173.25 cubic inches
1 gallon of mixed epoxy = 231 cubic inches
TotalBoat Epoxy River Table Project Kits are available in a Quart Kit (1 Quart High Performance Epoxy Resin Part A, and 1/2 Quart High Performance Slow Epoxy Hardener Part B), and a Gallon Kit (1 Gallon High Performance Epoxy Resin Part A, and ½-Gallon High Performance Slow Epoxy Hardener Part B).
Video Overview
-
-
Sand the wood with 120-grit sandpaper (included in the kit) so the epoxy will bond with the wood.
-
Vacuum to remove sanding dust.
-
Wipe the surface with a clean, lint-free rag dampened with acetone or denatured alcohol to remove remaining dust or surface contaminants.
-
'NOTE': Use acetone for white oak or oily hardwoods such as mahogany because it helps remove oil from the surface and improve adhesion. For most other types of wood, you can wipe with denatured alcohol instead of acetone.
-
-
-
TotalBoat High Performance Epoxy is very versatile and will be used in this project as a seal coat, and to build the layers of the epoxy river.
-
Mix resin and hardener components: You'll want to mix enough resin to apply a thin seal coat to your piece(s) of decorative wood.
-
Pump method for dispensing: Since you're only doing a thin seal coat, not a flood coat, use the TotalBoat 2:1 Epoxy Pumps for dispensing. Dispense 2 parts TotalBoat High Performance Epoxy Resin to 1 part TotalBoat High Performance Slow Hardener, by volume.
-
The TotalBoat High Performance 2:1 Pumps are calibrated to measure the exact amounts of epoxy resin and hardener for you. The procedure for dispensing TotalBoat High Performance Epoxy Resin and Hardener is ALWAYS ONE full pump of resin to ONE full pump of hardener. The pumps measure the components automatically.
-
How much material do the TotalBoat 2:1 resin and hardener pumps dispense by volume? The volume of the 2:1 epoxy resin pump is 8 cc per stroke, and the volume of the 2:1 hardener pump is 4 cc per stroke.
-
Apply a thin seal coat: Brush on a thin coat of mixed epoxy to seal the wood. A thin coat, as opposed to a thick coat, will stabilize the wood, but not allow bubbles in the seal coat. Seal the wood with one or two thin coats of mixed epoxy, and allow to dry.
-
This important step prevents air in the wood from off-gassing and creating air bubbles once you've poured a flood coat of epoxy over it.
-
Sand: When completely dry, sand the surface with 120-grit sandpaper to scuff the surface so the flood coat of epoxy will adhere properly.
-
-
-
Build a mold to fit around your piece(s) of decorative wood.
-
Use packing tape (provided in the kit) to line the inside of the mold so the cured epoxy won't stick to it. NOTE: You can also use Tyvek tape.
-
With the hot glue gun (included in the kit), seal all the interior side seams and corners of the mold so no epoxy leaks out.
-
Using a tongue depressor, push the hot glue into the seams for a perfect seal.
-
Tip: Secure the wood to the bottom of the mold, either with your first pour of mixed epoxy (which will seep underneath the wood), or with hot glue. If you don't secure the wood to the bottom of the mold, it may float to the top of your first pour (which is sometimes the desired effect).
-
-
-
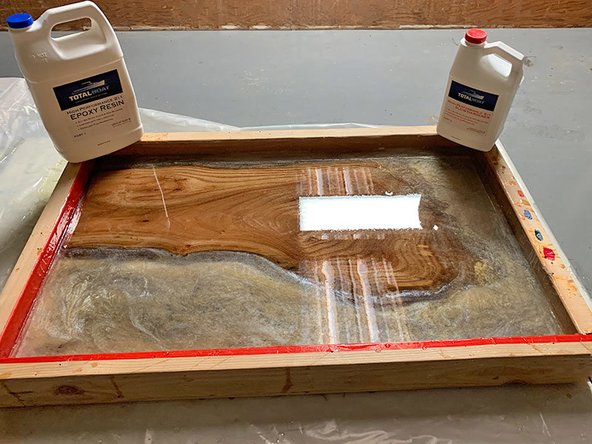
The maximum thickness for a flood coat of mixed TotalBoat High Performance Epoxy is 1/8" to 1/4" - PER COAT. Keep this in mind when you are dispensing the components.
-
Dispense 2 parts TotalBoat High Performance Epoxy Resin to 1 part TotalBoat High Performance Slow Hardener (by volume) into a clean mixing cup. In this step, you'll want to use the pour method for dispensing, instead of the pumps because you are using a larger volume of mixed epoxy for a flood coat. A flood coat is a thick coat of epoxy.
-
Pour method for dispensing (by volume): Use the markings on the included plastic mixing cup to measure 2 parts TotalBoat High Performance Epoxy and 1 part High Performance Slow Hardener, by volume.
-
EXAMPLES:
-
8 oz. epoxy resin and 4 oz. hardener (12 oz. total)
-
14 oz. epoxy resin and 7 oz. hardener (21 oz. total)
-
-
-
Be sure to mix both components thoroughly to ensure a proper cure. For large volumes, you can use a drill mixer on low speed to avoid introducing excess air bubbles into the mix. For smaller volumes, use the 2-cup mixing method.
-
Mixing Tip: When mixing the components, stir slowly. Aggressive stirring creates a lot of air bubbles, which can remain suspended in the epoxy.
-
2-cup mixing method:
-
Use a clean wooden stir stick to mix both components slowly and thoroughly for 1-3 minutes. While stirring, be sure to scrape the bottom, sides, and lower corners of the cup.
-
Pour the mixture into second clean mixing cup and stir again for 1-3 minutes.
-
-
-
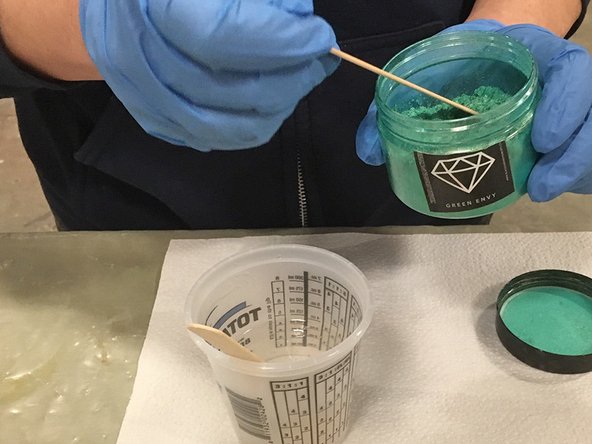
Add epoxy-safe pigments, as desired, and stir to mix thoroughly.
-
Tips for Using Pigments:
-
Remember that a little pigment goes a long way, so start with less – you can always add more.
-
There are so many epoxy-safe pigments other than those included in our Epoxy River Table Kit. The TotalBoat Epoxy Pigments Kit has a variety of alcohol ink colors, opaque colors & a larger selection of mica powder pigments. The TotalBoat TotalTint Mixol Universal Pigments Kit contains concentrated pigments preferred for their color and depth.
-
-
-
IMPORTANT: The maximum thickness per layer is no more than 1/4".
-
Slowly pour the first layer of mixed epoxy into the prepared mold.
-
Remove surface bubbles: To pop surface bubbles wave the heat gun (included in the kit) — on low setting — quickly back and forth across the surface. Keep the heat six inches above the surface so you don't discolor or scorch the epoxy. You're not trying to pop every bubble in one pass, but are helping the bubbles to rise to the surface and pop.
-
Allow to cure for 2-6 hours before pouring the next flood coat.
-
-
-
Repeat Steps 5-8 to do complete the amount of pours (max. depth 1/4") needed to fill your mold.
-
For multiple pours, wait 2-6 hours before doing another pour. You want to pour the next layer when the epoxy is still in the gel state and the heat caused by the reaction has dissipated.
-
Tip: If you wait too long between pours and the surface hardens completely, don't worry. Get some 120-grit sandpaper and scuff the surface lightly. Vacuum to remove sanding residue, and wipe the surface clean with a clean, lint-free rag dampened with denatured alcohol. Let it dry completely before applying the next layer of mixed epoxy.
-
-
-
Repeat Steps 5-8 for the final pour.
-
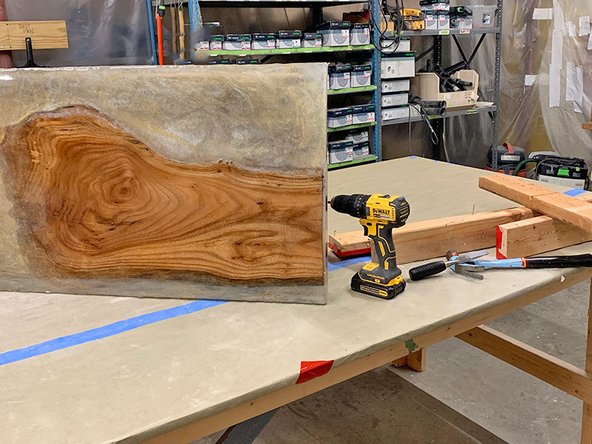
Allow the surface to cure completely. A full cure will take about two days.
-
-
-
When the epoxy has hardened completely, carefully remove your river table from the mold.
-
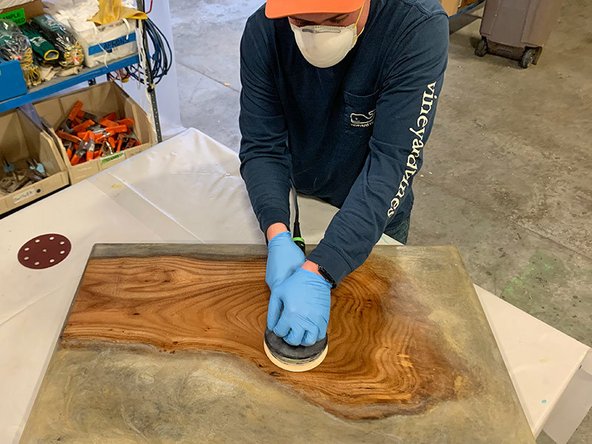
Use the sandpaper included in the kit to sand the river table top in steps, starting with 120-grit sandpaper to remove any lines left behind by the tape or any bubbles.
-
After sanding with 120 grit until the surface is smooth, move to the next finer grit and sand until smooth. Repeat this process until you sand all the way to 3000 grit.
-
Sanding Tip: Dry sand using grits from 120-320. Wet sand using grits from 400-3000. To wet sand, wet the surface with a water-soaked rag, then sand as needed.
-
-
-
In this step, you'll use TotalBoat TotalShine finishing compound and TotalBoat Premium Boat Wax to create a beautiful, durable finish for your river table top.
-
Polish: Apply TotalBoat TotalShine to the top, and with your buffer, polish the surface. Easy does it – avoid pressing down hard on the buffer or you'll mar the surface.
-
Buffing Tip: Start by choosing the lowest setting on your buffer to spread the product around. Then keep increasing the speed (while applying less pressure) until you are maxed out. Buff until shiny.
-
Wax: Apply TotalBoat Premium Boat Wax with a microfiber towel. Put a generous amount of wax on a clean rag and work the wax into the surface. Use a new, dry microfiber towel to remove all wax, and polish to a brilliant shine.
-
-
-
Add legs to your project to make it a table. Table legs are available online in a variety of sizes, shapes, styles, and materials. We chose metal legs for our table.
-
-
-
Stand back and wait for the compliments to start pouring in!
-
The pigment colors used for this river table include these Black Diamond Mica Powder Pigments: Pure White, Liberty Copper, Battleship Gray, and Cobalt Blue. All of these colors are included in our TotalBoat Epoxy River Table Kit.
-
-
-
What is epoxy sensitization? Ever hear of someone getting a skin rash after using epoxy? A rash is one form of sensitization — it's the process where your body gets more and more sensitive to epoxy products. Rashes are a common sign, but eyes, nose, throat, & lungs can also be affected. Everyone reacts differently, so proper PPE is critical.
-
Before you start making your epoxy river table, we recommend the following:
-
Take a look at the safety data sheets (SDS) for each product, paying special attention to the safety information in Section 8: Exposure Controls/Personal Protection.
-
Gather the proper PPE (personal protective equipment) recommended by the manufacturers, such as suitable gloves and proper protection for skin, lungs, eyes, and clothing.
-
Make sure your work area is well ventilated.
-


TotalBoat has a variety of project-ready kits available to turn resin into remarkable things - including decorative epoxy coasters for your new river table.
Our TotalBoat DIY Maker’s Kits are ideal for those who’ve already done some epoxy projects, or those who want to try an epoxy project, but don’t know where to start. Check them out!